MySQL Engines: InnoDB vs. MyISAM – A Comparison of Pros and Cons

MySQL Engines: InnoDB vs. MyISAM – A Comparison of Pros and Cons

by Yang Yang on September 2, 2009

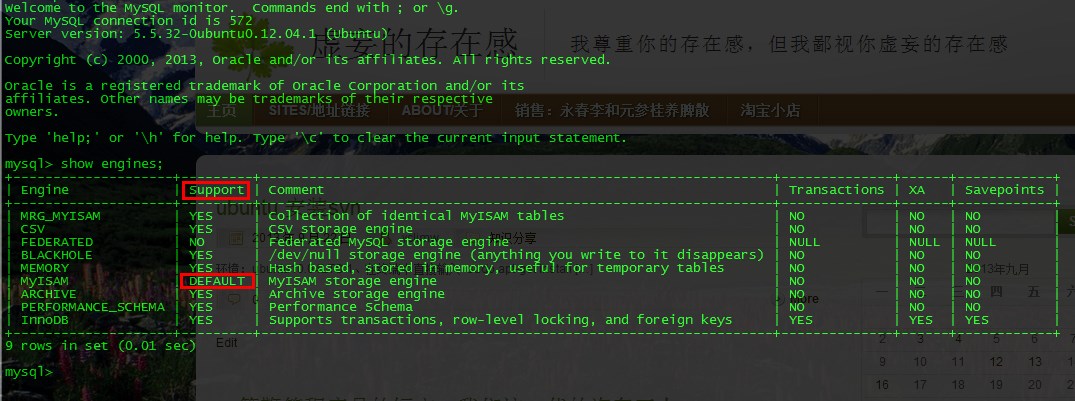
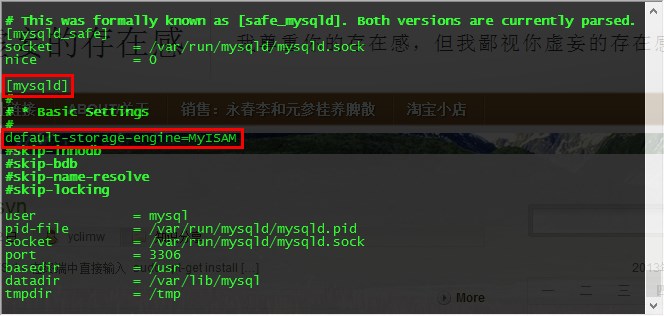
    The 2 major types of table storage engines for MySQL databases are InnoDB and MyISAM. To summarize the differences of features and performance,
  1. InnoDB is newer while MyISAM is older.
  2. InnoDB is more complex while MyISAM is simpler.
  3. InnoDB is more strict in data integrity while MyISAM is loose.
  4. InnoDB implements row-level lock for inserting and updating while MyISAM implements table-level lock.
  5. InnoDB has transactions while MyISAM does not.
  6. InnoDB has foreign keys and relationship contraints while MyISAM does not.
  7. InnoDB has better crash recovery while MyISAM is poor at recovering data integrity at system crashes.
  8. MyISAM has full-text search index while InnoDB has not.

In light of these differences, InnoDB and MyISAM have their unique advantages and disadvantages against each other. They each are more suitable in some scenarios than the other.

Advantages of InnoDB

  1. InnoDB should be used where data integrity comes a priority because it inherently takes care of them by the help of relationship constraints and transactions.
  2. Faster in write-intensive (inserts, updates) tables because it utilizes row-level locking and only hold up changes to the same row that’s being inserted or updated.

Disadvantages of InnoDB

  1. Because InnoDB has to take care of the different relationships between tables, database administrator and scheme creators have to take more time in designing the data models which are more complex than those of MyISAM.
  2. Consumes more system resources such as RAM. As a matter of fact, it is recommended by many that InnoDB engine be turned off if there’s no substantial need for it after installation of MySQL.
  3. No full-text indexing.

Advantages of MyISAM

  1. Simpler to design and create, thus better for beginners. No worries about the foreign relationships between tables.
  2. Faster than InnoDB on the whole as a result of the simpler structure thus much less costs of server resources.
  3. Full-text indexing.
  4. Especially good for read-intensive (select) tables.

Disadvantages of MyISAM

  1. No data integrity (e.g. relationship constraints) check, which then comes a responsibility and overhead of the database administrators and application developers.
  2. Doesn’t support transactions which is essential in critical data applications such as that of banking.
  3. Slower than InnoDB for tables that are frequently being inserted to or updated, because the entire table is locked for any insert or update.

The comparison is pretty straightforward. InnoDB is more suitable for data critical situations that require frequent inserts and updates. MyISAM, on the other hand, performs better with applications that don’t quite depend on the data integrity and mostly just select and display the data.

修改mysql的默认存储引擎

  1. 查看mysql存储引擎命令,在mysql>提示符下搞入
    show engines;

    字段 Support为:Default表示默认存储引擎  ,如下图:

  2. 设置InnoDB为默认引擎:在配置文件my.cnf中的 [mysqld] 下面加入default-storage-engine=INNODB 一句
    • Ubuntu系统下,my.cnf文件的路径为:/etc/mysql/my.cnf
  3. 重启mysql服务器:mysqladmin -u root -p shutdown或者service mysqld restart 登录mysql数据库

Linux下发现未授权登录用户怎么办

Linux下发现未授权登录用户怎么办

如果担心有非法用户闯入系统,最简单的办法就是用w命令来检查。

如果真的看到有非法用户在你的系统上,可以立即 kill 他的进程。

用vi /etc/passwd 命令把他的口令修改为“*”,或者把shell改为/sbin/nologin

先用w命令查看该用户tty号,然后用fuser -k tty号(或显示pts/*)就可以踢出了

即先用w命令查看在线用户,然后pkill -kill -t tty  如pkill -kill -t pts/1

MySql实现远程连接

1、进入mysql,创建一个新用户root,密码为root

   格式:grant 权限 on 数据库名.表名 to 用户@登录主机 identified by “用户密码”;


           grant select,update,insert,delete on *.* to root@192.168.1.12 identified by “root”;


   原先数据表结构

mysql> use mysql;

Database changed

mysql> select host,user,password from user;

+———–+——+——————————————-+
| host      | user | password                                  |
+———–+——+——————————————-+
| localhost | root | *81F5E21E35407D884A6CD4A731AEBFB6AF209E1B |
+———–+——+——————————————-+

   执行上述语句后结果

mysql> use mysql;
Database changed
mysql> select host,user,password from user;
+————–+——+——————————————-+
| host         | user | password                                  |
+————–+——+——————————————-+
| localhost    | root | *81F5E21E35407D884A6CD4A731AEBFB6AF209E1B |
| 192.168.1.12 | root | *81F5E21E35407D884A6CD4A731AEBFB6AF209E1B |
+————–+——+——————————————-+
2 rows in set (0.00 sec)


   可以看到在user表中已有刚才创建的root用户。host字段表示登录的主机,其值可以用IP,也可用主机名,

   (1)有时想用本地IP登录,那么可以将以上的Host值改为自己的Ip即可。

2、实现远程连接(授权法)

   将host字段的值改为%就表示在任何客户端机器上能以root用户登录到mysql服务器,建议在开发时设为%。  
   update user set host = ’%’ where user = ’root’;

   将权限改为ALL PRIVILEGES

mysql> use mysql;
Database changed
mysql> grant all privileges  on *.* to root@’%’ identified by “root”;
Query OK, 0 rows affected (0.00 sec)

mysql> select host,user,password from user;
+————–+——+——————————————-+
| host         | user | password                                  |
+————–+——+——————————————-+
| localhost    | root | *81F5E21E35407D884A6CD4A731AEBFB6AF209E1B |
| 192.168.1.12 | root | *81F5E21E35407D884A6CD4A731AEBFB6AF209E1B |
| %            | root | *81F5E21E35407D884A6CD4A731AEBFB6AF209E1B |
+————–+——+——————————————-+
3 rows in set (0.00 sec)

这样机器就可以以用户名root密码root远程访问该机器上的MySql.

3、实现远程连接(改表法)

use mysql;

update user set host = ‘%’ where user = ‘root’;

这样在远端就可以通过root用户访问Mysql.

xx is not in the sudoers file 问题解决

我用的是redhat5.4,在一般用户下执行sudo命令提示llhtiger is not in the sudoers file. This incident will be reported.解决方法:

一、$whereis sudoers -------找出文件所在的位置,默认都是/etc/sudoers         
二、 #chmod u+w /etc/sudoers    以超级用户登录su -root ,修改文件权限即添加文件拥有这的写权限 限,ls -al /etc/sudoers 可以查看原文件的权限。    
三、vim /etc/sudoers 编辑文件,在root ALL=(ALL)ALL行下添加XXX ALL=(ALL)ALL,XXX为你的用户名。添加方法:找到root行,按下”i“键进入编辑模式添加即可!编辑好后esc键进入一般模式,“:wq”保存退出!
最后, #chmod u-w /etc/sudoers 回到文件的原权限!


下面这个稍微详细一点:

在ubuntu中由于禁用了root用户,默认情况下会把安装系统时建立的用户添加到sudoers中。但在redhat和centos中并没有把任何root用户之外的用户默认的添加到sudoers之中。这样我们在执行sudo 命令时就会出现xxx is not in the sudoers file. This incident will be reported.这样的错误输出。现在为了安全起见比较提倡使用普通用户做日常操作,而在需要超级用户的时候使用sudo 来做,这样,我们就有必要把一些用户添加到sudoers之中。
其实把用户添加到sudoers之中很简单。
首先利用whereis 命令查找sudoers配置文件的目录(默认会在/etc/sudoers)
[root@localhost yclimw ]# whereis sudoers
sudoers: /etc/sudoers /etc/sudoers.bak /usr/share/man/man5/sudoers.5.gz
然后需要切换到root用户,更改/etc/sudoers的权限
[root@localhost yclimw ]# chmod u+w /etc/sudoers
然后就可以利用vi编辑器来把用户添加到sudoers之中
[root@localhost yclimw ]# vim /etc/sudoers
然后找到root    ALL=(ALL)       ALL所在的位置,把所要添加的用户添加到文件之中,

顺便提一下vi编辑器的用法。刚进入vi编辑器的时候牌命令行模式,这时可以通过方向键来移动光标,找到要编辑的位置之后按下“i”,然后就进入了插入模式,这时候你可以输入或删除字符。编辑完成之后按“esc”键退出插入模式,进入命令行模式,这时候按“:”可以进入末行模式,输入“wq”保存并退出。

下面是添加完的结果。
## Allow root to run any commands anywhere
root    ALL=(ALL)       ALL
yclimw ALL=(ALL)       ALL              (这一行是添加的内容,yclimw 是我的用户名)
然后需要把sudoers 的写权限去掉(否则系统不允许执行suoders文件):
[root@localhost yclimw ]# chmod u-w /etc/sudoers
至此,在退出root用户之后就可以利用sudo命令来执行超级用户的权限了。